Here it is guys, our last Halloween tutorial for this year! This year a lot of people seem to have taken a shot at creating a Day of the Dead look. In Mexico, and maybe other countries as well, they celebrate their lost loved ones by preparing a great feast including their lost loved ones' favorite dishes and by creating lots of very decorative sugar skulls as treats. This is how this tutorial came about! A lot went into this look so let's jump into to it!

So for the white base I once again used the Fantasy Makers Painter's Palette, just blended it all over my face with my fingers. Next I did the eyes, which in my opinion is the main focus in this look. I first outlined the shape I wanted around the eyes using a black eyeliner. I then filled the inside of the circle using the navy blue in the Wet n Wild Blue had me at Hello Palette. I just patted the shadow on using a flat eye shadow brush. Then I outlined the navy blue with a teal shadow from the same palette. Next I created the scalloped bordering with my black eyeliner again, all filled it in with Last Call eye shadow from the Urban Decay Ammo Palette. Then I moved to the nose, I outlined the shape I wanted and then filled it in with the same navy blue shadow I used for the eyes. As you can tell from the pictures, I scratched my nose before taking the pictures and forgot to retouch the shadow I removed, sorry! Anywho, I moved on to the rose on my chin. This was by far the most difficult part for me. It took me quite a while to find a picture of a rose online that I could recreate, and then successfully transfer it onto my chin. I suggest practicing on a piece of paper before drawing on your chin. Once I had it down, I outline the rose shape on my chin using my black eyeliner. I filled it in with the red from the Fantasy Makers Painter's Palette, and used the teal shadow from before to fill in the leaves on either side. I have to say that I am quite proud of the results, no matter what anybody says haha. You can be creative with it though, and do whatever you'd like.
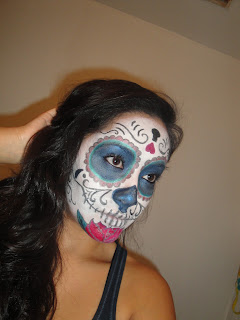
Lastly I did all of the resting designs with the same black eyeliner. As you can tell, your black eyeliner will be your best friend with this look. The tear drop on the right was the only other thing I filled in with the navy blue shadow. Oh and the upside down heart was filled with the same red as the rose. That basically sums up my Day of the Dead look! I had SO much fun creating this look, even though it took a very long time to create, and even a longer time to remove haha. I will most likely rock this the day of Halloween since I don't really feel like dawning a full-on costume. I hope you guys enjoyed this and give it a try!
Have a fun AND safe Halloween!


